Simple start
From sselab
| (143 intermediate revisions not shown) | |||
| Line 1: | Line 1: | ||
| - | [[File: | + | [[File:services.png|right|200px]] |
| + | |||
| + | |||
| + | |||
| + | |||
| + | |||
You have been invited to the [http://sselab.de/ sselab] and you have no idea what this means? | You have been invited to the [http://sselab.de/ sselab] and you have no idea what this means? | ||
| - | You probably shall share some documents | + | |
| - | + | ||
| - | + | ||
| - | + | ||
| - | + | ||
| - | [[File:registration.png|center| | + | You probably shall share some documents (--> [[Simple_start#Storage|storage]]) within a team or shall collect thoughts, ideas, problems etc.(--> [[Simple_start#Wikis|wiki]]). |
| - | + | ||
| - | + | An automatically generated mailing list (--> [[Simple_start#Mailing_List|mailing list]]) is also available. Let's forget about all the other services for now and lets handle this: | |
| - | [[File:complete.png| | + | |
| + | |||
| + | |||
| + | |||
| + | * You need to make an account. | ||
| + | ''(Having an account simplifies access when using multiple projects. All services and projects can be accessed and managed with one account and password.)'' | ||
| + | |||
| + | |||
| + | * You got an invitation via email. Click the link in that email. | ||
| + | |||
| + | |||
| + | [[File:invitation.png|center|frame|Invitation E-Mail]] | ||
| + | |||
| + | |||
| + | |||
| + | * Choose 'Create new Account' if you don't have one yet. | ||
| + | |||
| + | |||
| + | [[File:dialog.png|center|frame|Login Dialog]] | ||
| + | |||
| + | |||
| + | |||
| + | * Enter some personal data, it is really helpful to use your surname as login (or another name that identifies you to the other team members). | ||
| + | |||
| + | |||
| + | [[File:registration.png|center|frame|SSELab Registration Form]] | ||
| + | |||
| + | |||
| + | |||
| + | * You will have to check and confirm (or correct) your data and with that you have created the account and are member of the project. | ||
| + | |||
| + | |||
| + | [[File:complete.png|center|frame|Registration Confirmation]] | ||
| + | |||
| + | * This allows you to login to sselab and browse the project data. | ||
| + | |||
| + | |||
| + | |||
| + | |||
| + | |||
| + | |||
| Line 23: | Line 68: | ||
#* BTW: When the project is called "example", the according maillinglist where you can reach all other members is "example@lab9.sselab.de" | #* BTW: When the project is called "example", the according maillinglist where you can reach all other members is "example@lab9.sselab.de" | ||
| - | |||
| - | |||
| - | |||
| - | |||
| - | |||
| - | |||
| - | + | ||
| - | + | ||
| - | + | ||
| - | + | ||
| - | + | = Storage = | |
| + | [[File:storage.png|right|200px]] | ||
| + | |||
| + | |||
| + | You want to to share files with the members of your project with them having the rights to read and write? Like a big shared online folder accessible via your File Manager e.g. Windows Explorer? Fast and easy? | ||
| + | |||
| + | |||
| + | |||
| + | |||
| + | |||
| + | |||
| + | |||
| + | |||
| + | |||
| + | |||
| + | [[File:choosestorage.png|center|frame|Choose Storage in Services List on Overview Page]] | ||
| + | |||
| + | |||
| + | * Click on 'Storage' on the project's overview page in the services List. | ||
| + | |||
| + | Now you can browse the files and folders online and read and download files directly here via the webbrowser. | ||
| + | |||
| + | [[File:browse.png|center|frame|Browse Files and Folders]] | ||
| + | |||
| + | But to easily upload files, you need to connect your file browser to the online folder. First copy the URL of the Storage folder from the adress field of your webbrowser. | ||
| + | |||
| + | |||
| + | [[File:copyurl.png|center|frame|Copy the URL]] | ||
| + | |||
| + | |||
| + | Further steps are for windows users. There might be slight differences related to version and/or edition but altogether it will work very much similar. Open your ''File Manager'' '''''Windows Explorer''''' e.g. by pressing 'windows-key' + 'e' or double-clicking on the workspace icon. You will see the different drives and memory devices listed, each represented by a different character. Special options (including 'map network drive') only appear at root folder. | ||
| + | |||
| + | Use the option "connect network drive". | ||
| + | |||
| + | [[File:networkdrive.png|center|frame|View: Windows Explorer @ Windows7 \root]] | ||
| + | |||
| + | |||
| + | Fill in data, especially the URL of the Storage folder into the field 'Folder:' | ||
| + | |||
| + | Then check both checkboxes. First effects, that the connection will be established everytime you start windows. Second allows you to fill in username and password for authentification ones, which is necessary for using the service. Then click 'finish'. | ||
| + | |||
| + | [[File:mapnetworkdrive.png|center|frame|View: Windows Explorer @ Windows7 \root]] | ||
| + | |||
| + | As already mentioned above, you will have to authentificate ones forever. Fill in your sselab username and password and check the box, so that you won't have to fill in every time. | ||
| + | |||
| + | [[File:authentification.png|center|frame|Authentification Dialog]] | ||
| + | |||
| + | Very nice. Now you can use the online storage folder completely adequate to your other folders via your file manager 'windows explorer'. | ||
| + | |||
| + | = Mailing List = | ||
| + | [[File:mailing.png|right|200px]] | ||
| + | |||
| + | |||
| + | You want to send an email to all project members (and managers)? | ||
| + | |||
| + | |||
| + | |||
| + | |||
| + | |||
| + | |||
| + | |||
| + | |||
| + | [[File:choose.png|center|frame|Choose Mailing List in Services List on Overview Page]] | ||
| + | |||
| + | |||
| + | * Click on 'Mailing List' on the project's overview page in the services List | ||
| + | |||
| + | |||
| + | |||
| + | [[File:clickmailinglist.png|center|frame|Mailto: Mailing List of the Project]] | ||
| + | |||
| + | |||
| + | If you have a standard email program an empty new email to all members of the project will open. If you haven't, just copy the email adress, open an email and paste the adress into the adress field. | ||
| + | |||
| + | |||
| + | [[File:newemail.png|center|frame|Clicking on the Mailto-Hyperlink causes Popping Up of an empty but already adressed Email]] | ||
= Wikis = | = Wikis = | ||
| + | [[File:Mediawiki.png|right|100px]] | ||
Its simple: | Its simple: | ||
| Line 44: | Line 159: | ||
# browse the project, | # browse the project, | ||
# click on "MediaWiki (internal)" | # click on "MediaWiki (internal)" | ||
| - | |||
# and you are looking at the wiki. Its a mediawiki -- same syntax, same features. | # and you are looking at the wiki. Its a mediawiki -- same syntax, same features. | ||
| - | This is just an | + | |
| + | [[File:choosewiki.png|center|frame|Choose MediaWiki (internal) in Services List on Overview Page]] | ||
| + | |||
| + | |||
| + | This is just an abstract overview -- see [http://www.mediawiki.org/wiki/Help:Editing_pages MediaWiki Website]: | ||
* To edit full page: click "Edit" on the left side | * To edit full page: click "Edit" on the left side | ||
* To edit a section: click "[edit]" on the right side | * To edit a section: click "[edit]" on the right side | ||
* When the page is important and you want to be informed by email of any change: click "Watch" | * When the page is important and you want to be informed by email of any change: click "Watch" | ||
| - | + | ||
| - | ** | + | |
| + | [[File:wiki.png|center|frame|Normal and Editor View of a Wiki Page]] | ||
| + | |||
| + | |||
| + | === Some syntax:=== | ||
| + | |||
| + | ---- | ||
| + | |||
| + | '''bold text''' | ||
| + | <nowiki>'''bold text'''</nowiki> | ||
| + | |||
| + | ---- | ||
| + | |||
| + | |||
| + | ''italic text'' | ||
| + | <nowiki>''italic text''</nowiki> | ||
| + | |||
| + | |||
| + | ---- | ||
| + | |||
| + | * list element | ||
| + | * list element | ||
| + | <nowiki>* list element | ||
| + | * list element</nowiki> | ||
| + | |||
| + | ---- | ||
| + | |||
| + | |||
| + | # numbered list element | ||
| + | # numbered list element | ||
| + | # numbered list element | ||
| + | |||
| + | <nowiki># numbered list element | ||
| + | # numbered list element | ||
| + | # numbered list element </nowiki> | ||
| + | ---- | ||
| + | |||
| + | [[File:Example.jpg]] | ||
| + | <nowiki>[[File:Example.jpg]]</nowiki> | ||
| + | |||
| + | By clicking on the new link you open the file upload dialog. Just try it, when you need to insert a picture. You will see, it is very easy. | ||
| + | |||
| + | |||
| + | ---- | ||
| + | |||
| + | [http://www.example.com External Link] | ||
| + | <nowiki>[http://www.example.com External Link]</nowiki> | ||
| + | |||
| + | An Hyperlink to the specified url (here 'http://www.example.com' which appears to the reader of the wiki article as 'External Link' ). | ||
| + | |||
| + | |||
| + | ---- | ||
| + | |||
| + | [[Link title]] | ||
| + | <nowiki>[[Link title]]</nowiki> | ||
| + | |||
| + | This is can be used to create a subpage. The link leads to a new yet empty (sub)page, Which is editable by project members. Until the target page exists, the link is red. | ||
| + | |||
| + | === Headline 3 === | ||
| + | <nowiki>=== Headline 3 ===</nowiki> | ||
| + | |||
| + | This sections your articles. An 'edit button' will appear on top of each section - only visible for the members of the project. Count of '=' signifies level of Headline. <nowiki>= Headline 1 =</nowiki> is adequate to <nowiki><h1></nowiki>-tag in html. | ||
| + | |||
| + | |||
| + | |||
| + | |||
| + | |||
| + | |||
| + | |||
| + | = Further Steps = | ||
| + | |||
| + | For now, the three mentioned and explained services will be sufficient. But in the near future you might want to have a look at the following page [[Further Steps]] which handles more sophisticated tasks and the associated services, e.g. Version Control with subversion. | ||
Current revision as of 17:10, 19 March 2012
You have been invited to the sselab and you have no idea what this means?
You probably shall share some documents (--> storage) within a team or shall collect thoughts, ideas, problems etc.(--> wiki).
An automatically generated mailing list (--> mailing list) is also available. Let's forget about all the other services for now and lets handle this:
- You need to make an account.
(Having an account simplifies access when using multiple projects. All services and projects can be accessed and managed with one account and password.)
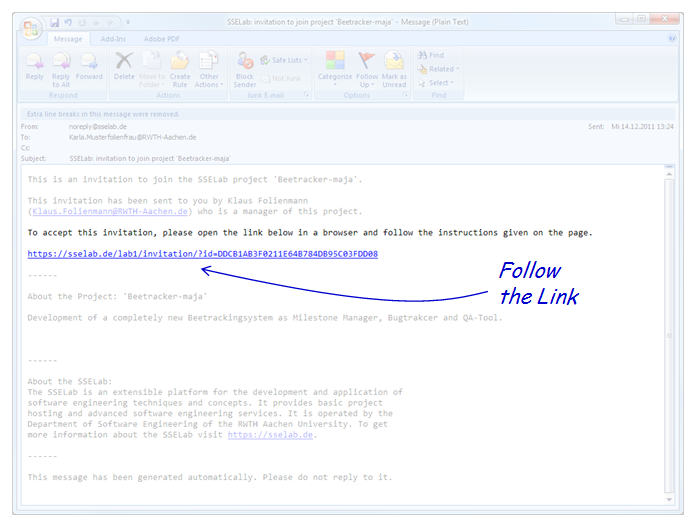
- You got an invitation via email. Click the link in that email.
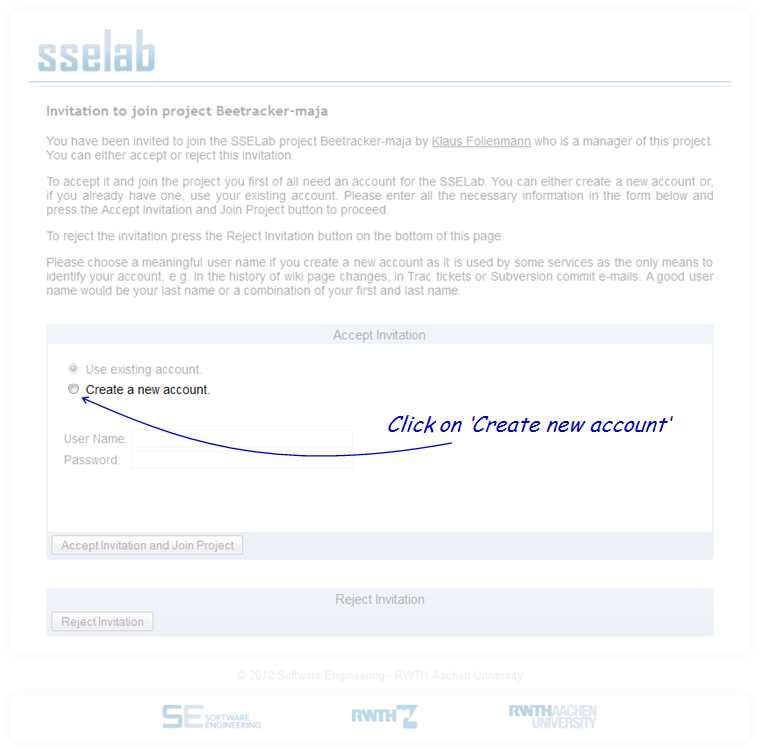
- Choose 'Create new Account' if you don't have one yet.
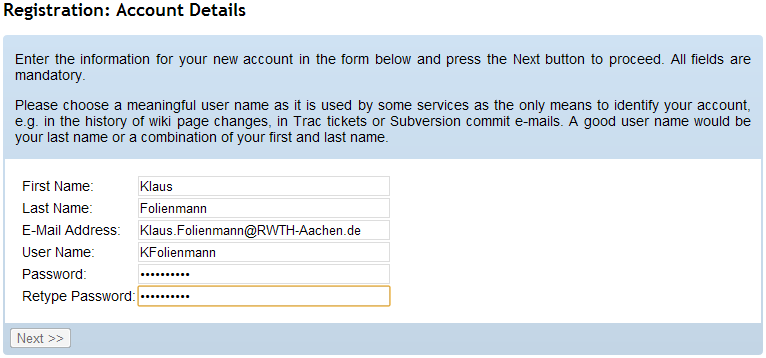
- Enter some personal data, it is really helpful to use your surname as login (or another name that identifies you to the other team members).
- You will have to check and confirm (or correct) your data and with that you have created the account and are member of the project.
- This allows you to login to sselab and browse the project data.
Contents |
What's next?
You can
- Browse the projects services
- Checkout svn (if it is a selected service)
- Look at the internal and external wikis (if selected services)
- Note that the external wiki is globally visible, while only you can write
- Install the webdav (if selected service)
- Look at the mailinglist
- BTW: When the project is called "example", the according maillinglist where you can reach all other members is "example@lab9.sselab.de"
Storage
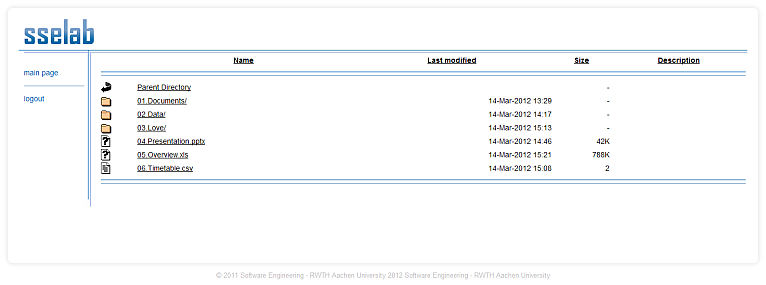
You want to to share files with the members of your project with them having the rights to read and write? Like a big shared online folder accessible via your File Manager e.g. Windows Explorer? Fast and easy?
- Click on 'Storage' on the project's overview page in the services List.
Now you can browse the files and folders online and read and download files directly here via the webbrowser.
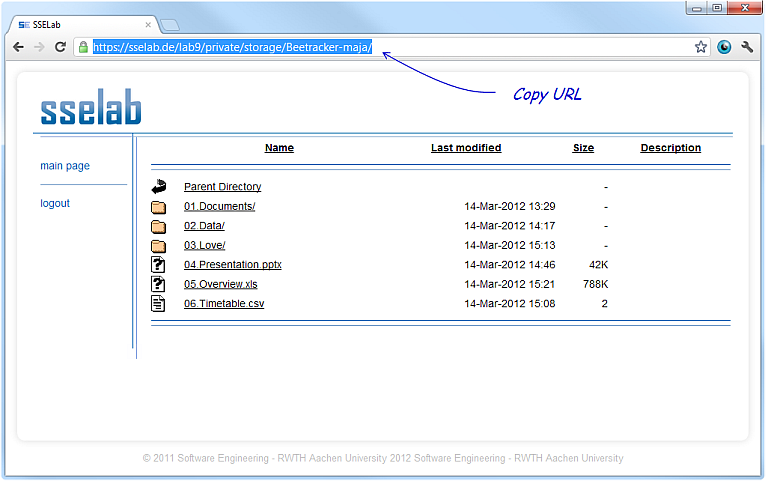
But to easily upload files, you need to connect your file browser to the online folder. First copy the URL of the Storage folder from the adress field of your webbrowser.
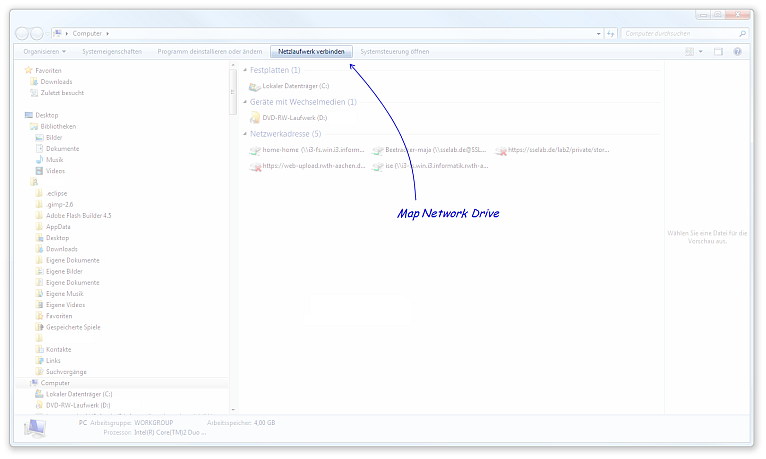
Further steps are for windows users. There might be slight differences related to version and/or edition but altogether it will work very much similar. Open your File Manager Windows Explorer e.g. by pressing 'windows-key' + 'e' or double-clicking on the workspace icon. You will see the different drives and memory devices listed, each represented by a different character. Special options (including 'map network drive') only appear at root folder.
Use the option "connect network drive".
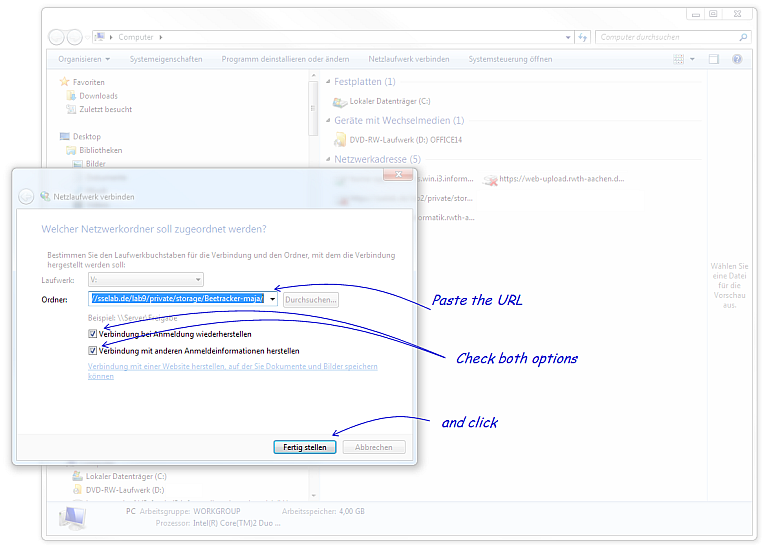
Fill in data, especially the URL of the Storage folder into the field 'Folder:'
Then check both checkboxes. First effects, that the connection will be established everytime you start windows. Second allows you to fill in username and password for authentification ones, which is necessary for using the service. Then click 'finish'.
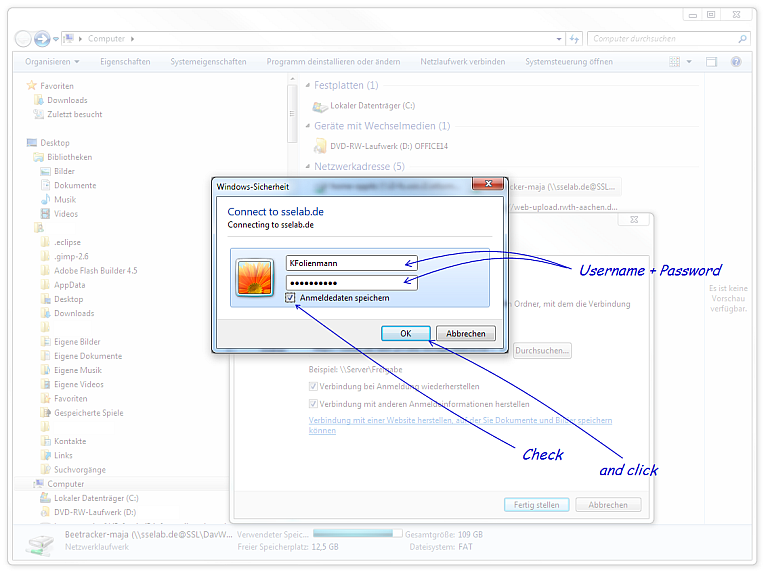
As already mentioned above, you will have to authentificate ones forever. Fill in your sselab username and password and check the box, so that you won't have to fill in every time.
Very nice. Now you can use the online storage folder completely adequate to your other folders via your file manager 'windows explorer'.
Mailing List
You want to send an email to all project members (and managers)?
- Click on 'Mailing List' on the project's overview page in the services List
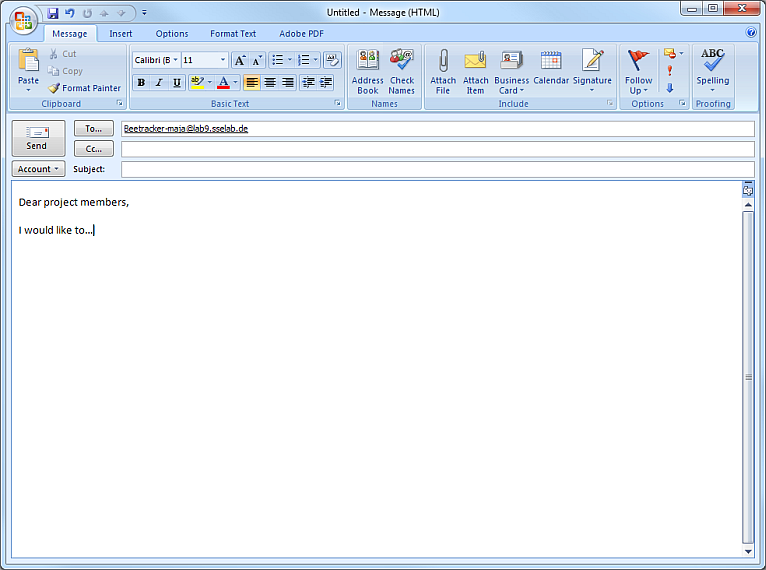
If you have a standard email program an empty new email to all members of the project will open. If you haven't, just copy the email adress, open an email and paste the adress into the adress field.
Wikis
Its simple:
- browse the project,
- click on "MediaWiki (internal)"
- and you are looking at the wiki. Its a mediawiki -- same syntax, same features.
This is just an abstract overview -- see MediaWiki Website:
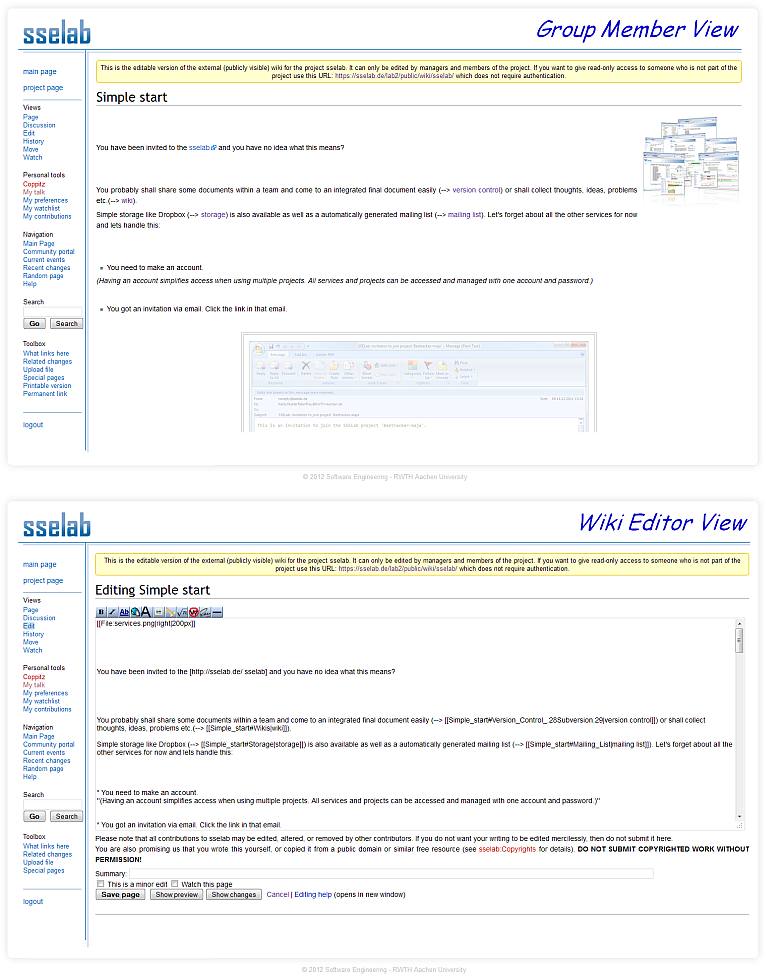
- To edit full page: click "Edit" on the left side
- To edit a section: click "[edit]" on the right side
- When the page is important and you want to be informed by email of any change: click "Watch"
Some syntax:
bold text
'''bold text'''
italic text
''italic text''
- list element
- list element
* list element
* list element
- numbered list element
- numbered list element
- numbered list element
# numbered list element
# numbered list element
# numbered list element
[[File:Example.jpg]]
By clicking on the new link you open the file upload dialog. Just try it, when you need to insert a picture. You will see, it is very easy.
[http://www.example.com External Link]
An Hyperlink to the specified url (here 'http://www.example.com' which appears to the reader of the wiki article as 'External Link' ).
[[Link title]]
This is can be used to create a subpage. The link leads to a new yet empty (sub)page, Which is editable by project members. Until the target page exists, the link is red.
Headline 3
=== Headline 3 ===
This sections your articles. An 'edit button' will appear on top of each section - only visible for the members of the project. Count of '=' signifies level of Headline. = Headline 1 = is adequate to <h1>-tag in html.
Further Steps
For now, the three mentioned and explained services will be sufficient. But in the near future you might want to have a look at the following page Further Steps which handles more sophisticated tasks and the associated services, e.g. Version Control with subversion.
- This page was last modified on 19 March 2012, at 17:10.
- This page has been accessed 919,061 times.
